If you wish to send emails through Aplos and control what emails can be used for the Sender you must first authenticate your email domain. This helps email providers know that Aplos has permission to send emails on your behalf and can be trusted, which improves email deliverability. Once you authenticate your domain, you can add any valid email addresses with the same domain you wish to use.
Authenticating your domain requires updating records where your domain is hosted. This requires access to your web hosting by your webmaster or an IT professional.
If you have not yet authenticated a domain, emails will use a default system email address, such as comms@aplos.org, as the sender. This includes automated donation email receipts, email campaigns, and emailed contribution statements or invoices.
Why Domain Authentication Improves Email Deliverability
Email platforms have implemented more stringent safeguards to reduce spoofing and spam. A best practice is to send from a custom domain (such as name@organizationname.org) rather than using a free domain like Gmail, Yahoo, or Outlook. Using a custom domain will increase your sending reputation with email service providers and your emails are more likely to make it into your recipient’s inbox.
In addition to improving deliverability, using a custom domain can also improve trust and engagement with your supporters. An email with a custom domain looks more professional and is displayed in the email header of their inbox, so the contact will be more likely to open it if they recognize your organization’s name.
How Do You Get a Custom Domain for an Email Address?
You can only authenticate domains that are owned by you or your organization. You will not be able to authenticate an unregistered domain or a generic email domain (i.e. gmail.com, hotmail.com, etc.). If you currently have an email address from a free email provider, you will need to make some changes with an IT professional.
- If You Don’t Have a Website
If you don’t have a website or a domain that you have purchased, you can purchase a domain through a web hosting or domain hosting site. Once you purchase a custom domain, you can usually choose to set up a new email address with it through the domain registrar, or you can set it up through Gmail. - If You Do Have a Website
Check with your web hosting provider, webmaster, or IT department to enable the email option or add it to your web hosting package.
How to Authenticate Your Domain
If you wish to authenticate your domain, you will need to add DNS (Domain Name Service) records wherever you host your domain. To get started, log in to your Aplos account, select the Settings gear, and click “Email” to visit the Email Configuration page. This section can only be accessed by Aplos users who have the role permission of Administrator.
Step 1: Add Custom Email Domain
First, click “Authenticate a Domain.” Once you have started the authentication process, enter your valid email domain into the field (i.e. aplos.com) and click “Add.”
Note: You can only authenticate one domain per Aplos account.

Next, wait for a notification from Aplos that the domain can now be verified. It may take several hours to receive the email. Then you will see the values that will be used in Step 2.

Step 2: Adding DNS Records to Domain Hosts
If Aplos hosts your website, please contact our support team to authenticate your DNS Records.
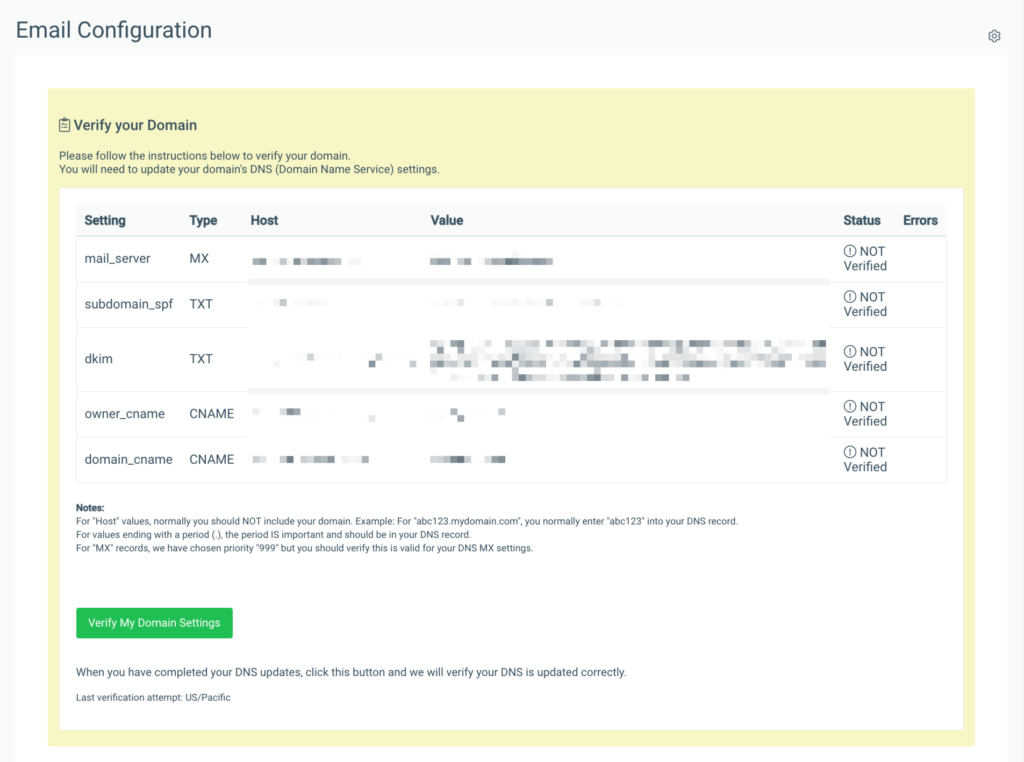
Each domain host has slightly different recommendations and instructions for adding DNS records, so it is recommended that you work with a webmaster and IT professional. To verify your domain by successfully adding the records, you will need to provide them the Type, Host, and Value for each record shown so they can add the DNS records in your domain host.
In general, the webmaster will log in to your domain host and locate the DNS Records, usually under the account settings. Once located, create a new DNS record for each line item and set the type to the corresponding type MX, CNAME or TXT. Copy the Host field value shown in Aplos and paste it into the corresponding field in your DNS record. Be careful not to add any extra spaces or values. Next, copy the Value shown in Aplos and paste into the value field in your DNS record.
Typically, you will need to create 1 MX DNS record, 2 separate TXT DNS records, and 2 separate CNAME DNS records, one for each value shown in Aplos. We recommend setting your TTL in DNS Record to the default value of your domain host.
Each domain host will vary in its instructions for adding DNS records, so if you are unsure how to add the provided records, find more detailed instructions using the links to support centers for popular domain hosts below.
Note* Not supported by Wix
Step 3: Verifying Your Domain
Once you have added the values into your Domain DNS settings where you host your domain, go to the Email Configuration page under Settings in Aplos.
Click “Verify My Domain Settings.” Aplos will check to verify your valid domain name by looking for the values on your domain server.

All of the records must be verified to successfully authenticate your domain. Once verified, the page will update to show you the Domain status and the date it was verified.

Tips if your records were not verified:
- Some domain servers require up to a 48-hour period for changes to be detected. If it has been less than this period of time, you may need to simply wait a little longer and then select the “Verify My Domain Setting” button again to re-attempt verification.
- Confirm that the values shown in Aplos exactly match those provided in your DNS server, and review your DNS host instructions for updating records.
Once you complete the authentication process, you can begin adding email addresses with the same domain without repeating the authentication.
How to Add and Remove Sender Email Addresses
Adding Email Addresses
Once you have authenticated your domain, you can now add email addresses that use the same domain on the Email Configuration page under “Email Addresses.”
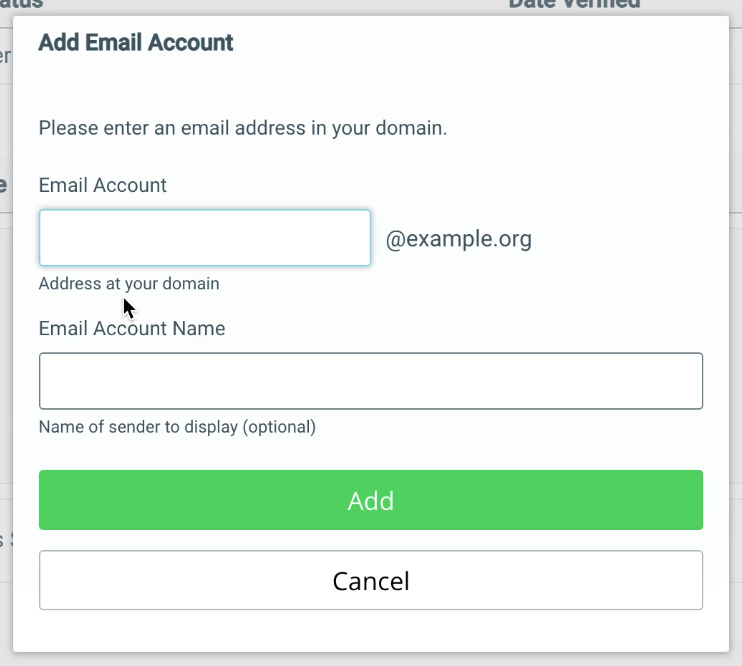
To add a new email address with the same domain, click “Add Email Account” or select the gear icon on the top right of your screen and click “Add Email Account.”

This will open a box to enter the email address you wish to add. Insert the first part of the email address that appears before the domain under Email Account. You also have an option to add the name of the sender under Email Account Name. Once the information is entered, click “Add”to finish. Repeat the steps to enter each of the sender email addresses you need. You can always add more at a later date.

Removing Email Addresses
If you wish to remove an email address so it will no longer be used to send communications within Aplos, you can do so on the Email Configuration screen. Hover over the email address you wish to remove. Select the icon on the far right of the screen and click “Remove Address.” This will prompt you to verify that you wish to remove the email. Click “Remove” to finish.

If desired, you can add this email address back later by following the steps above to add an email address.
Removing Your Domain
If you need to remove your custom domain from Aplos, you can do so on the Email Configuration page. Removing the domain will remove the ability to send communications within Aplos from your custom email addresses, and future communications will default to a system email address, such as comms@aplos.org.
To begin, locate the gear icon on the top right of the page and select “Remove Domain.” This will prompt you to verify once more the domain you wish to remove. Click “Remove” to finish. If you decide to add the domain back at a later date, you will need to re-authenticate your domain using the steps above for “How to Authenticate Your Domain.”


